Schema Markup for SEO: How to Implement Structured Data That Earns Rich Results
When I first started adding schema markup to client websites back in 2018, most marketers dismissed it as “developer stuff.”...
When I first started adding schema markup to client websites back in 2018, most marketers dismissed it as “developer stuff.”...

If your website has more than 10,000 pages, your XML sitemap strategy can make or break your SEO performance. I’ve...
When I first started adding schema markup to client websites back in 2018, most marketers dismissed it as “developer stuff.” Fast forward to 2026, and structured data has become one of the most powerful — yet still underused — SEO tools available. Only 31.3% of websites implement any schema markup at all, which means there’s a massive competitive advantage waiting for those who do it right.
In this guide, I’ll walk you through everything you need to know about schema markup — from the basics of how it works to advanced strategies for earning rich results and getting cited by AI search engines. No theoretical fluff, just practical implementation you can apply today.
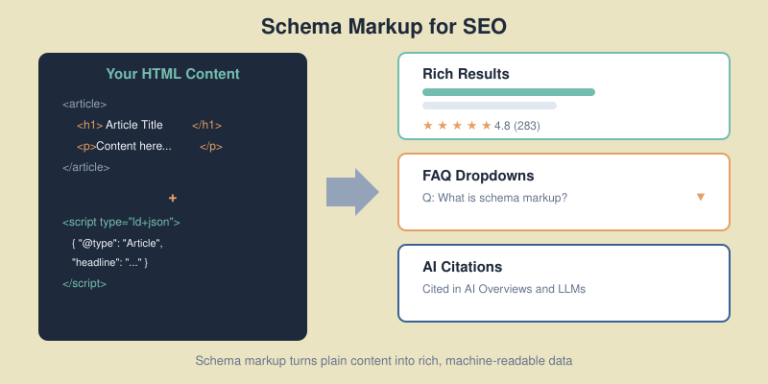
Schema markup is a standardized vocabulary of tags (developed by Schema.org) that you add to your HTML to help search engines understand the context and meaning of your content. Think of it as a translation layer between your website and machines.
Without schema, Google sees your page as text. With schema, it understands that “Markus Schneider” is a Person, “Bootstrap8” is an Organization, and your blog post is an Article published on a specific date with a specific author.
This understanding directly translates into two measurable outcomes:
The data backs this up: pages with rich results achieve 82% higher click-through rates compared to standard listings, a lift you can verify through website traffic analysis. For FAQ schema specifically, CTR improvements can reach 87%.

Schema markup comes in three formats: JSON-LD, Microdata, and RDFa. Use JSON-LD. Google explicitly recommends it, and it’s by far the easiest to implement and maintain.
JSON-LD sits in a <script> tag in your page’s <head> section — completely separate from your visible HTML. This means you can add, edit, or remove schema without touching your page content.
Here’s what a basic Article schema looks like:
<script type="application/ld+json">
{
  "@context": "https://schema.org",
  "@type": "Article",
  "headline": "Your Article Title Here",
  "author": {
    "@type": "Person",
    "name": "Markus Schneider"
  },
  "publisher": {
    "@type": "Organization",
    "name": "Bootstrap8"
  },
  "datePublished": "2026-02-06",
  "dateModified": "2026-02-06",
  "description": "A concise description of this article."
}
</script>
The @context tells machines you’re using Schema.org vocabulary. The @type declares what kind of thing you’re describing. Everything else provides the properties that search engines and AI systems use to understand and display your content.
There are over 797 schema types on Schema.org, but for blogs and content websites, you only need to focus on a handful. I’ve ranked these by impact — start at the top and work down.

This is your foundation. Every blog post should have Article or BlogPosting schema. The difference is simple: BlogPosting is a more specific subtype of Article. Both work for rich results, but BlogPosting signals to search engines that your content is part of a blog — which can influence how it appears in Google Discover and News.
Key properties to always include:
headline — your article title (under 110 characters)author — a Person type with name and ideally a URL to an author pagedatePublished and dateModified — ISO 8601 formatimage — URL to the article’s featured imagepublisher — your Organization with logodescription — a concise summaryFAQ schema is arguably the highest-ROI structured data you can add. When it triggers, your search listing expands with clickable question-and-answer dropdowns — pushing competitors further down the page.
More importantly for 2026: FAQ schema is the easiest path to AI search visibility. The question-answer format mirrors exactly how LLMs process and cite information. Content with proper FAQ schema has a 2.5x higher chance of appearing in AI-generated answers.
I add 3-5 FAQ questions to every article I publish on Bootstrap8. The key is using questions people actually search for — check “People Also Ask” in Google and forums like Reddit for real queries.
With Google’s E-E-A-T guidelines, author identity matters more than ever. Person schema connects your content to a real human author with credentials, making your expertise machine-readable.
Include these properties for maximum impact:
name — full author namejobTitle — your professional titleurl — link to your author/about pagesameAs — array of social profile URLs (LinkedIn, Twitter)knowsAbout — topics you’re expert inThis builds what Google calls “entity recognition” — connecting your name across the web as a recognized authority on specific topics.
Your site’s identity. Organization schema tells search engines who publishes the content, which feeds into trust signals. At minimum, include your name, URL, logo, and social profiles.
Breadcrumbs help search engines understand your site structure and display navigation paths directly in search results. Instead of showing just a URL like bootstrap8.com/schema-markup-seo/, Google displays: Bootstrap8 > SEO > Schema Markup for SEO — which gives users context before they click.
An emerging type worth watching. Speakable schema identifies sections of your content best suited for audio playback by voice assistants. With 35% of searches now happening via voice, this is becoming increasingly relevant. Currently limited to news publishers in the US and still in beta, but implementing it now puts you ahead of the curve.
In January 2026, Google deprecated several structured data types. If you’ve been using any of these, they’ll no longer trigger rich results:
The good news: none of these affect typical blog or content sites. The core schema types — Article, FAQ, Breadcrumb, Organization, Person, HowTo, and Product — remain fully supported.
As Google’s John Mueller clarified: “Schema is here to stay, but specific markup types come and go.” No penalties for having deprecated schema on your site — it simply stops generating rich results.
My advice: remove deprecated schema to keep your markup clean, but don’t panic. Focus your energy on the schema types that still drive results.

Here’s what makes schema markup genuinely exciting right now: it’s no longer just about Google rich results. AI search engines — ChatGPT, Perplexity, Google AI Overviews — all rely on structured data to extract, verify, and cite information.
When I implemented comprehensive schema across a client’s content site last year, we saw a measurable increase in AI Overview appearances within 8 weeks. The data from multiple studies confirms this isn’t anecdotal:
dateModified signals freshness — a key factor in AI citationDifferent AI systems use schema differently. Google AI Overviews pull heavily from FAQ and HowTo schema for direct answers. ChatGPT and Perplexity weigh the combination of schema + content quality + source authority. But across all platforms, having structured data is better than not having it.

If you’re on WordPress (which powers 43% of the web), you have two options: plugins or manual implementation. Here’s my honest assessment of both.
Yoast SEO automatically generates Article, Organization, Person, and Breadcrumb schema for every page. It’s reliable and requires zero configuration for basic schema. The downside: FAQ and HowTo schema require using specific Gutenberg blocks — you can’t add them to existing content without reformatting.
Rank Math offers more granular control. You can add FAQ, HowTo, and custom schema types directly from the post editor sidebar. It also validates schema in real-time and alerts you to errors. I generally recommend Rank Math for sites that want to go beyond basic schema without writing code.
One critical warning: never run both plugins simultaneously. This creates duplicate schema markup that confuses search engines and can prevent rich results entirely. Pick one and stick with it.
For maximum control, add JSON-LD directly to your theme’s header.php or via a custom must-use plugin. This is what I do for Bootstrap8 — our FAQ schema is managed through a lightweight mu-plugin that reads post meta and outputs JSON-LD in the <head>.
The advantage of manual implementation: no plugin bloat, no conflicts, and complete control over exactly what schema appears on each page type. The trade-off is that you need to maintain it yourself.

Implementing schema is only half the job. You need to verify it actually works — and keep it working.
Go to search.google.com/test/rich-results and paste your page URL. This tool shows you exactly which rich results your page is eligible for and flags any errors or warnings.
Use validator.schema.org for a deeper technical check. This catches structural issues that the Rich Results Test might miss — like incorrect nesting, missing required properties, or invalid data types.
After publishing, monitor the “Enhancements” section in Google Search Console. This shows real-world data: how many pages have valid schema, which errors Google detected during crawling, and whether your schema actually triggered rich results.
Common errors I see regularly:
image in Article schema or acceptedAnswer in FAQ schema2026-02-06), not “February 6, 2026”
Schema markup is powerful, but it’s not risk-free. Google does penalize sites for misleading or spammy structured data. Here are the mistakes I see most often:
Your schema must describe content that’s actually visible on the page. Adding FAQ schema for questions that aren’t displayed to users violates Google’s guidelines and can trigger a manual action.
Adding Review or AggregateRating schema to pages that don’t contain genuine reviews is the fastest way to get a structured data penalty. I’ve seen sites lose all rich results across their entire domain because of this.
Running Yoast plus a separate schema plugin plus manually coded JSON-LD creates three layers of conflicting markup. Search engines don’t know which to trust and often ignore all of them. Audit your site for duplicate schema before adding anything new.
If your schema includes a dateModified that’s current but the actual content hasn’t been updated, Google considers this misleading. Always update both the content and the schema date together.
You need to track whether your schema investment actually pays off. Here’s the framework I use:
1. Baseline your current CTR. In Google Search Console, note the average CTR for pages you’re adding schema to. Filter by page, record impressions and clicks for the 30 days before implementation.
2. Wait 4-6 weeks. Google needs time to re-crawl your pages, process the schema, and start showing rich results. Don’t check daily — it takes patience.
3. Compare CTR after implementation. Same pages, same timeframe. A 20-40% CTR improvement is typical for pages that earn rich results. One content site I worked with jumped from 3.2% to 5.8% average CTR after implementing FAQ schema across 50 articles.
4. Monitor rich result coverage. In Search Console’s Enhancements section, track how many pages have valid rich results versus errors. Your goal is 100% valid across all pages with schema.
The real numbers from industry case studies confirm the ROI: sites with comprehensive schema markup see an average 15-30% increase in organic traffic within 3-6 months, with Rotten Tomatoes reporting a 25% higher CTR and e-commerce sites seeing up to 4.2x higher visibility in Google Shopping.
No, schema markup is not a direct ranking factor. It doesn’t boost your position in search results. However, it earns rich results that significantly increase click-through rates — which indirectly improves your SEO performance through higher engagement signals.
Yes. Misleading schema — such as fake reviews, ratings for unreviewed content, or markup describing invisible content — can trigger a Google manual action. This can remove all rich results from your site. Always ensure your schema accurately reflects visible page content.
FAQ schema delivers the highest ROI for most blogs. It expands your search listing with clickable Q&A dropdowns, can increase CTR by up to 87%, and aligns perfectly with how AI search engines extract and cite information.
Typically 2-6 weeks. Google needs to re-crawl your pages and process the structured data before rich results appear. Monitor the Enhancements section in Google Search Console to track when your schema becomes active.
Not necessarily. WordPress plugins like Rank Math and Yoast SEO handle basic schema automatically. For custom schema types like FAQ or advanced Article markup, you’ll need to either use plugin features or add JSON-LD code manually — which requires basic HTML knowledge but not programming expertise.
If your website has more than 10,000 pages, your XML sitemap strategy can make or break your SEO performance. I’ve seen large e-commerce sites with millions of products struggle to get indexed — not because their content was bad, but because their sitemaps were a mess.
When I audited a 500,000-page e-commerce site last year, only 23% of their product pages were indexed. The culprit? A single bloated sitemap with broken URLs, non-canonical pages, and no logical organization. After restructuring their XML sitemap architecture, indexed pages jumped to 78% within three months.
In this guide, I’ll share the exact best practices I use for large websites — the same strategies that help enterprise sites get their content discovered and indexed efficiently.
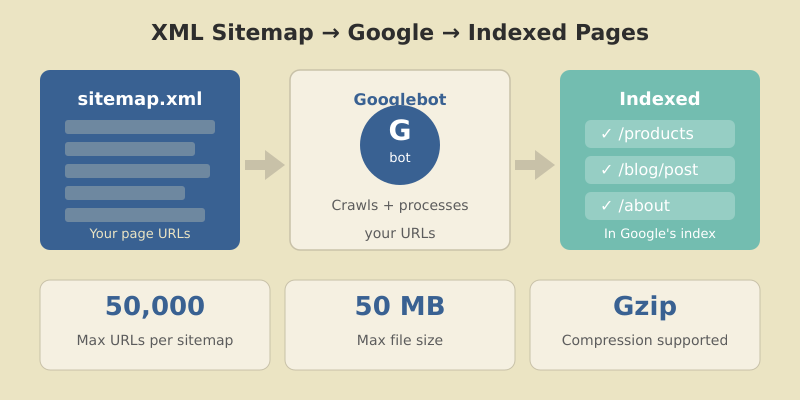
An XML sitemap is a file that lists all the important URLs on your website. It helps search engines like Google discover, crawl, and index your pages more efficiently.
For small sites with good internal linking, sitemaps are helpful but not critical. For large websites? They’re essential.
Here’s why:
lastmod dates speed this up.Google’s Gary Illyes has stated that Google is working toward “crawling less frequently, but more efficiently.” For large sites, this means well-structured sitemaps aren’t optional — they’re your lifeline to search visibility.
Before diving into best practices, understand the hard limits set by search engines:
| Limit Type | Maximum Value |
|---|---|
| URLs per sitemap | 50,000 |
| File size per sitemap | 50 MB (uncompressed) |
| Sitemaps per index file | 50,000 |
| Index file size | 50 MB (uncompressed) |
| Sitemap indexes per site (GSC) | 500 |
If your website has 200,000 URLs, you need at least 4 separate sitemaps (or more, for better organization) plus a sitemap index file to reference them all.
In practice, I recommend keeping sitemaps well under these limits — around 10,000-25,000 URLs per file. This makes debugging easier and reduces server load during crawls.
Before making changes, understand what you’re working with.
Find your current sitemap by checking these common locations:
yoursite.com/sitemap.xmlyoursite.com/sitemap_index.xmlyoursite.com/robots.txt (look for Sitemap: directive)Go to Indexing → Sitemaps in GSC. For each submitted sitemap, note:
A large gap between discovered and indexed URLs signals problems — either with the sitemap itself or with page quality. Pairing sitemap data with website traffic analysis helps you understand the full picture of how search engines interact with your site.
Use Screaming Frog or a similar crawler to analyze your sitemap URLs:
Every non-200, non-canonical URL in your sitemap wastes crawl budget and sends mixed signals to Google.
This is the most common mistake I see on large sites: sitemaps stuffed with URLs that shouldn’t be there.

index, follow or no robots meta tagnoindex tag?sort=price)I’ve worked on sites where 60% of sitemap URLs were non-indexable. Cleaning these up alone improved crawl efficiency dramatically.
Don’t dump all URLs into one giant sitemap. Split them logically.

For a typical e-commerce or content site:
| Sitemap | Contents | Example URLs |
|---|---|---|
| sitemap-pages.xml | Static pages | /about, /contact, /pricing |
| sitemap-posts.xml | Blog posts | /blog/post-title |
| sitemap-products.xml | Product pages | /products/item-name |
| sitemap-categories.xml | Category pages | /category/shoes |
| sitemap-images.xml | Image sitemap | Product images |
For very large sites, split further by subcategory, date, or alphabetically:
sitemap-products-a.xml (products starting with A)sitemap-products-b.xmlsitemap-posts-2025.xmlsitemap-posts-2026.xmlThe sitemap index file references all individual sitemaps:
<?xml version="1.0" encoding="UTF-8"?>
<sitemapindex xmlns="http://www.sitemaps.org/schemas/sitemap/0.9">
  <sitemap>
    <loc>https://example.com/sitemap-pages.xml</loc>
    <lastmod>2026-01-12</lastmod>
  </sitemap>
  <sitemap>
    <loc>https://example.com/sitemap-products.xml</loc>
    <lastmod>2026-01-12</lastmod>
  </sitemap>
</sitemapindex>
Submit only the index file to Google Search Console. Google will discover and crawl all referenced sitemaps automatically.
The lastmod tag tells search engines when a page was last meaningfully updated. Used correctly, it helps Google prioritize crawling. Used incorrectly, it destroys your credibility.

lastmod only when content actually changesGoogle’s John Mueller has confirmed they track lastmod accuracy. Sites that abuse it get their lastmod signals ignored.
Proper format examples:
<lastmod>2026-01-12</lastmod>
<lastmod>2026-01-12T15:30:00+00:00</lastmod>You’ll see these tags in many sitemap examples:
<changefreq>weekly</changefreq>
<priority>0.8</priority>
Google ignores both. They’ve confirmed this multiple times.
These tags were useful in 2005. Today, Google determines crawl frequency and page importance through its own signals — your declarations don’t influence their decisions.
You can include them without penalty, but I recommend removing them entirely. They add file size and create false expectations about what your sitemap controls.
For sitemaps approaching the 50MB limit, use Gzip compression. Google fully supports .xml.gz files.
Benefits:
Creating compressed sitemaps:
gzip -k sitemap-products.xml
# Creates sitemap-products.xml.gz
Update your sitemap index to reference the compressed version:
<loc>https://example.com/sitemap-products.xml.gz</loc>I’ve used this on sites with 2+ million URLs. Without compression, serving sitemaps would significantly impact server performance during crawls.
Static sitemaps work for small sites. For large, frequently-changing sites, dynamic generation is essential.
WordPress: Use Yoast SEO or Rank Math — both generate dynamic sitemaps automatically and handle the technical requirements.
Custom CMS: Query your database for indexable URLs and generate XML on request (with caching).
Static Site Generators: Build sitemaps during the build process. Tools like next-sitemap for Next.js or gatsby-plugin-sitemap handle this well.
For very large sites, consider hybrid approaches: generate sitemaps periodically (hourly/daily) and cache them, rather than building on every request.
Creating perfect sitemaps means nothing if you don’t submit and monitor them.

Google will crawl your index and discover all referenced sitemaps.
| Metric | What It Tells You |
|---|---|
| Discovered URLs | Total URLs Google found in sitemap |
| Indexed URLs | URLs actually in Google’s index |
| Index ratio | Indexed ÷ Discovered (aim for 80%+) |
| Errors | URLs Google couldn’t process |
| Last read | When Google last fetched the sitemap |
Check these weekly for large sites. A sudden drop in indexed URLs or spike in errors needs immediate investigation.
After auditing hundreds of sitemaps, these are the mistakes I see most often:
Including non-canonical URLs
If a page’s canonical tag points elsewhere, it shouldn’t be in your sitemap. This confuses Google and wastes crawl budget.
Mixing HTTP and HTTPS
Your sitemap URLs must match your canonical protocol. If your site is HTTPS, every sitemap URL should be HTTPS.
Forgetting robots.txt reference
Add your sitemap location to robots.txt:
Sitemap: https://example.com/sitemap_index.xmlNot updating after site changes
Migrated to a new URL structure? Deleted a product category? Your sitemap needs to reflect these changes immediately.
Submitting too many small sitemaps
While organization is good, don’t create thousands of tiny sitemaps with 10 URLs each. Find a balance — usually 5,000-25,000 URLs per sitemap works well.
Google determines crawl frequency based on your site’s update patterns. You can’t force more frequent crawls, but accurate lastmod dates help Google prioritize changed content. For news sites, Google may crawl sitemaps multiple times per day. For static sites, weekly or monthly is common.
For e-commerce and image-heavy sites, yes. Create a separate image sitemap or add image tags within your main sitemap. This helps Google discover images that might not be found through regular crawling, especially if they’re loaded via JavaScript.
A sitemap.xml file lists individual page URLs. A sitemap index file lists multiple sitemap files. For large sites exceeding 50,000 URLs, you need a sitemap index that references multiple smaller sitemaps. Submit only the index file to Google.
Sitemaps don’t directly improve rankings. They help with discovery and indexing — getting your pages into Google’s index. Once indexed, rankings depend on content quality, backlinks, and other SEO factors. However, pages that aren’t indexed can’t rank at all.
Check Google Search Console’s sitemap report. Compare “Discovered” vs “Indexed” URLs. A healthy sitemap shows 70-90%+ of discovered URLs indexed. Also monitor the “Coverage” report for indexing issues related to sitemap URLs.
A well-structured XML sitemap is one of the highest-impact technical SEO improvements you can make for large websites. The key principles are simple: include only indexable canonical URLs, organize logically by content type, use accurate lastmod dates, and monitor regularly in Search Console.
Start by auditing your current setup. Identify non-indexable URLs, split oversized sitemaps, and establish a dynamic generation process. Then monitor your index ratio monthly and investigate any drops.
For sites with 100,000+ pages, this isn’t optional optimization — it’s fundamental infrastructure. Get it right, and you’ll see measurable improvements in crawl efficiency and indexed page counts.
Your next step: Open Google Search Console right now. Check your sitemap’s discovered vs indexed ratio. If it’s below 70%, you have work to do — and now you know exactly how to fix it.
Honest reviews of analytics tools, SEO tactics that actually work, and growth strategies for bootstrapped SaaS — no fluff, no affiliate bias.